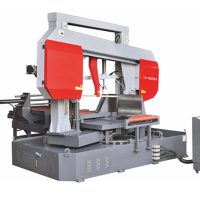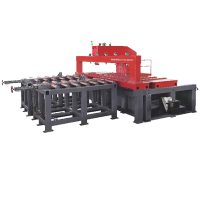
G5350/110/300 Vertical Band Saw Machine
Cutting Capacity :
Troubleshooting common band saw problems is a key skill for any woodworker or metalworker. A poorly tuned band saw can be frustrating, dangerous, and wasteful.
Here is a comprehensive guide to diagnosing and fixing the most common band saw issues.
90% of band saw problems are due to improper setup, not a faulty machine or blade. Always start with the fundamentals: Blade Selection, Blade Tracking/Tension, and Guide Setup.
What it is: The blade does not cut in a straight line, veering off to one side, even when you try to push the stock straight. The cut is not parallel to the fence.
Primary Causes & Solutions:
Incorrect Blade Tracking and Tension:
Cause: A loose blade will not run true on the wheels.
Solution: Increase tension. A properly tensioned blade will have very little lateral flex. Use the tension scale on your saw as a starting point, but learn the “flutter test.” With the saw off, push sideways on the blade with a finger; it should deflect about 1/4 inch. If it flutters excessively, it’s too loose.
Dull or Damaged Blade:
Cause: A dull blade will follow the path of least resistance, which is often not a straight line. A damaged tooth can also cause drift.
Solution: Install a new, sharp, high-quality blade. This is the most common fix for drift.
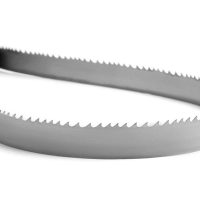
Incorrect Blade Type or Width:
Cause: A blade that is too wide for the radius you’re trying to cut, or a blade with the wrong tooth configuration (e.g., a hook-tooth blade for resawing instead of a skip-tooth) will drift.
Solution: Use the right blade for the job. For resawing and straight cuts, a wider blade (1/2″ or 3/4″) is more stable. For curves, a narrower blade is necessary but will drift more easily.
Misaligned Guides (Forcing the Blade):
Cause: If the guide bearings or blocks are not properly aligned behind the blade’s gullets, they can force the blade into a skewed position.
Solution: Reset all guides. The side guides should be just a hair’s breadth away from the blade, not touching during operation. The rear bearing should support the blade without causing it to move forward when spun by hand.
How to “Find” and Work with Drift (The Right Way):
Even a perfectly tuned saw can have a slight natural drift. Instead of fighting it, calibrate your fence to it.
Take a flat piece of scrap about 12″ long.
Draw a straight line down the middle, freehand, without using the fence.
Carefully follow the line, letting the saw find its own path. Don’t force it.
Stop the saw halfway, but don’t move the board.
Clamp or tape a straight board against the edge of your workpiece. This board is now a custom fence aligned to your blade’s natural drift.
Use this custom fence for all your cuts with that specific blade.
What it is: The cut surface is torn, has deep swirl marks, feels rough, or is burned.
Primary Causes & Solutions:
Dull Blade:
Cause: The number one cause of a poor finish. A dull blade tears the wood fibers instead of slicing them.
Solution: Replace the blade.
Incorrect Tooth Pitch (Teeth Per Inch – TPI):
Cause: Using too few TPI (e.g., a 3 TPI blade on thin stock) allows the teeth to grab and vibrate, creating a rough cut. Using too many TPI (e.g., a 14 TPI blade on thick stock) doesn’t provide enough chip clearance, causing heat and burning.
Solution: Follow the rule of thumb: At least 3 teeth, but no more than 24, should be in contact with the workpiece at any time. Use low TPI (3-6) for thick stock and resawing. Use high TPI (10-14) for thin stock and metals.
Feed Rate Too Fast or Too Slow:
Cause: Pushing too fast overloads the blade, causing tearing. Pushing too slow allows the blade to rub and generate heat, causing burning.
Solution: Feed the material at a consistent, steady rate that allows the blade to cut efficiently without straining the motor. You should hear a clean, steady cutting sound.
Improper Guide Setup:
Cause: If the side guides are too far away, the blade can twist and flutter, creating a wavy cut.
Solution: Reset the guides. The side guides should be positioned just behind the gullets of the teeth and should be close enough that you can fit a piece of paper between them and the blade. They should not be touching during a cut.
What it is: The blade snaps, often with a loud “PING!” and can be dangerous.
Primary Causes & Solutions:
Incorrect Tension:
Cause: This is the most common cause. A blade that is too loose can slip off the wheels and get pinched. A blade that is dramatically over-tensioned can be stressed to its breaking point.
Solution: Use the manufacturer’s tension guide. Modern bimetal blades often require higher tension than the saw’s scale indicates. The flutter test is a good practical check.
Forcing the Cut / Incorrect Feed Rate:
Cause: Pushing too hard, especially on a tight curve, puts immense lateral stress on the blade, causing it to fatigue and snap.
Solution: Let the blade do the work. If you hear the motor bog down, you are pushing too hard. For curves, use a narrower blade and make relief cuts.
Faulty Guide Adjustment:
Cause: If the rear bearing is too far forward, it forces the blade to run in a constant “backward” bend, work-hardening the metal until it cracks. If side guides are too tight, they create excessive friction and heat.
Solution: The rear bearing should only contact the blade during the cut, not when the blade is free-spinning. Re-adjust all guides.
Twisting or Pinching the Blade:
Cause: If the workpiece twists during a cut or if the kerf closes up and pinches the blade (in wood with internal stress), the blade will break.
Solution: Use a sharp blade. For resawing or long cuts, consider using a featherboard to maintain steady pressure and a wedge to keep the kerf open.
Fatigue from Small Wheels:
Cause: On band saws with small-diameter wheels, the blade undergoes a more extreme flexing cycle each time it goes around. This causes metal fatigue over time.
Solution: This is a limitation of the machine. You can extend blade life by reducing tension when the saw is not in use.
What it is: When cutting a curve, the blade doesn’t follow the line and you get a “flat spot” or an uneven radius.
Primary Causes & Solutions:
Blade is Too Wide:
Cause: A wide blade cannot navigate a tight radius. It binds in the cut.
Solution: Use the narrowest blade possible for the tightest curve in your project. Refer to a blade radius chart.
Forcing the Workpiece:
Cause: Pushing the wood through too fast without allowing the blade to clear the kerf.
Solution: Slow down! Feed steadily and rotate the workpiece smoothly and continuously. Don’t stop or push sideways.
Dull Blade:
Cause: A dull blade will follow the path of least resistance instead of the line you want.
Solution: Install a new blade.
Follow these steps in order whenever you install a new blade or if your saw is acting up.
Select the Right Blade: Match the width and TPI to your material and cut type.
Check Tires & Clean: Ensure the rubber tires on the wheels are clean, crowned, and not glazed. Clean with rubbing alcohol if needed.
Install & Track the Blade: Install the blade with the teeth pointing down towards the table. Adjust the upper wheel’s tilt (“tracking”) until the blade runs centered on the wheel crowns.
Tension the Blade: Set the tension according to the scale, then use the flutter test. It should feel like a plucked guitar string.
Adjust the Guides (CRITICAL STEP):
Upper Guides: Lower the upper guide assembly to just above your workpiece (about 1/4″).
Side Guides/Bearings: Loosen them and move them so they are just behind the blade’s gullets. Bring them in until they are a business card’s thickness away from the blade. They should NOT spin when the blade is free-running, only making contact during a cut.
Rear Bearing: Adjust it so it sits just behind the blade, not touching. When you push the blade forward (by hand, saw off), it should immediately contact the bearing.
Square the Table: Use a reliable square to ensure the table is 90° to the blade.
By methodically working through this checklist, you will solve the vast majority of band saw problems and achieve smooth, accurate, and safe cuts.
Cutting Capacity :
Cutting Capacity :